There’s just something special about sitting around a fire at the end of the day. Whether it’s beside a cargo trailer at a dispersed campsite, outside a tiny cabin in the woods, or simply relaxing on the back porch after work, a ammo can fire pit can the atmosphere. It slows things down and gives you a reason to sit still for a little while and enjoy where you are.
But over the years, we’ve realized something while traveling and camping: building a traditional wood fire isn’t always practical.
Sometimes the ground is soaked from rain. There might be a burn ban in effect. Sometimes there simply isn’t good firewood available nearby. And honestly, after a long driving day, there are times when we just want something quick, simple, and easy without hauling wood, fighting smoke, or smelling like a campfire for the next two days.
That’s what inspired this DIY portable propane fire pit project. The goal was to create something:
- compact,
- portable,
- inexpensive,
- rugged,
- and easy enough for almost anyone to build.
At the center of the project is a simple metal ammo can. Ammo cans already have a durable, industrial look that fits perfectly with cargo trailer camping and off-grid travel. They’re compact, easy to transport, and surprisingly well suited for this type of build.
Starting Your Project
After cleaning and prepping the ammo can, the exterior was coated with high-temperature black paint to create a clean, durable finish that could stand up to outdoor use and heat exposure. From there, the focus shifted to building a simple propane system that would function safely and efficiently.
One of the most important parts of the build is the propane burner and the #57 brass orifice. While it may look like a simple fitting, the orifice plays a major role in how the fire pit functions. As propane passes through the small opening inside the orifice, it creates what’s known as the venturi effect. This process pulls fresh air into the burner tube, mixing oxygen with propane before ignition.
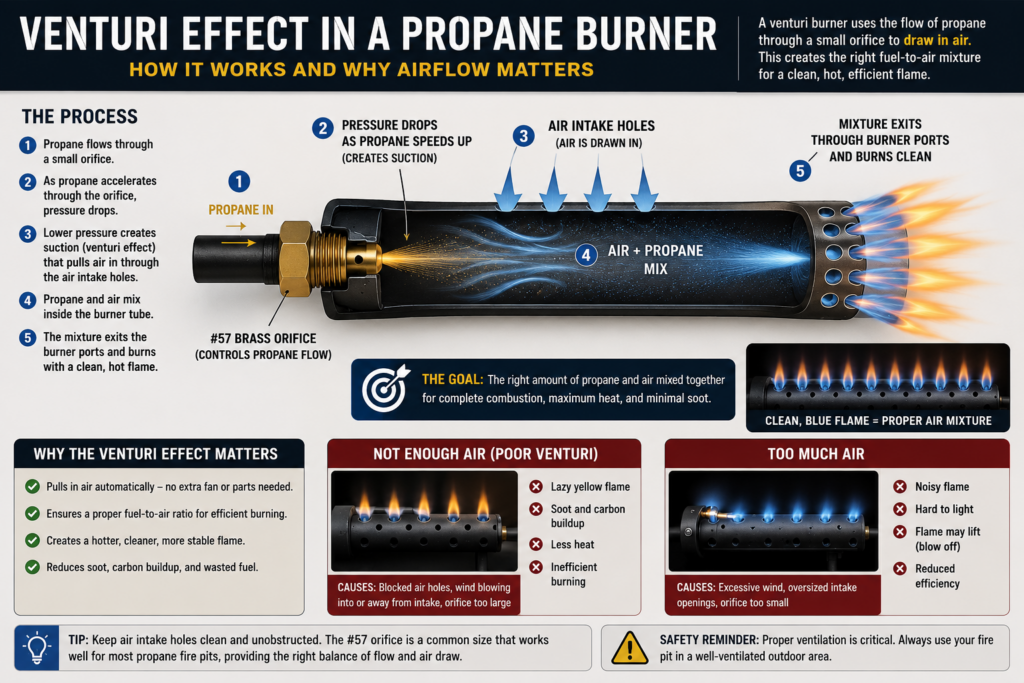
That airflow is critical. Without enough air entering the burner system:
- flames become yellow,
- soot begins forming,
- combustion becomes inefficient,
- and the fire pit simply won’t perform correctly.
That’s also why ventilation holes are drilled along the lower sides of the ammo can. Those holes are not just there for appearance or heat reduction — they serve several important purposes.
First, they allow fresh oxygen to enter the fire pit so the burner can operate correctly. Second, they help reduce heat buildup inside the ammo can. And perhaps most importantly, they provide a safe escape path for propane in the unlikely event of a leak or delayed ignition. Since propane is heavier than air, it naturally settles downward, making proper ventilation extremely important in enclosed metal containers.
One of the biggest priorities in this project was portability.
Design It To Meet Your Needs
The entire fire pit was designed to work well for cargo trailer camping, boondocking, dispersed camping, and off-grid travel. Traditional backyard fire pits are often heavy, bulky, and difficult to transport. This design keeps everything compact and manageable while still creating a comfortable campfire atmosphere almost anywhere.
To improve airflow and reduce heat transfer to the ground, removable pipe-style legs were added to the bottom of the ammo can. The legs raise the fire pit several inches off the ground while also giving it a rugged industrial appearance that fits perfectly with the overall style of the project.
One of the nice things about the removable leg design is that the legs can be unscrewed and stored directly inside the ammo can during transport. That keeps the entire setup self-contained and easy to pack in the back of a cargo trailer or SUV.
And honestly, that’s what this entire project is really about: simplicity.
A lot of DIY projects online can feel overly complicated or intimidating, especially when propane systems are involved. But this build is actually very approachable once you understand the basics of airflow, propane safety, and burner function.
At its core, this project is simply:
- a metal container,
- a burner,
- controlled airflow,
- and safe propane connections.
That’s it.
The result is a portable fire pit that lights quickly, produces very little smoke, and creates a relaxing campfire atmosphere without the hassle of building a traditional wood fire.

(Visit our YouTube Channel to learn more about our cargo trailer conversion, tiny cabin build, and more!)
This style of fire pit works especially well in areas where open wood fires may not be practical or allowed. Many public lands, campgrounds, and dispersed camping areas occasionally implement burn restrictions during dry conditions. In those situations, propane fire pits are often still allowed because they can be shut off instantly and create fewer fire hazards than open wood fires.
It’s also incredibly convenient after a long day of travel.
Instead of gathering wood, fighting damp firewood, or dealing with ashes, the process becomes simple:
connect propane, light the burner, and enjoy the evening. Whether used beside a cargo trailer in the mountains, outside a tiny cabin near the creek, or on a quiet back porch at home, this DIY portable propane fire pit fits perfectly into a simple outdoor lifestyle.
And maybe that’s the best part of projects like this.
They remind us that DIY doesn’t always have to be complicated or expensive. Sometimes it’s just about understanding the basics, taking your time, and building something practical that improves the way you enjoy everyday life outdoors.
Interested in shower options for your cargo trailer? Check out our blog here!